낙관적 업데이트와 React19 useOptimistic
항해 프론트엔드 3기 동기 분들과 React 19에 대해 학습하는 스터디를 진행했습니다.
스터디를 진행하며 useOptimistic 훅에 대해서 알게된 내용을 정리한 글입니다.
이름에서 유추할 수 있듯이 useOptimistic은 낙관적 업데이트를 적용할 때 사용할 수 있는 훅입니다.
그렇다면 낙관적 업데이트(Optimistic Updates)란 무엇일까요?
💡 낙관적 업데이트(Optimistic Updates)
낙관적 업데이트란 서버에 요청을 보내기 전에 UI를 먼저 업데이트하는 것을 말합니다.
요청이 항상 성공한다고 가정하고, 사용자의 액션에 따른 결과를 즉시 UI에 반영하여 사용자에게 빠른 피드백을 제공할 수 있습니다.
=> 인스타그램과 벨로그의 좋아요 버튼, 장바구니에 담긴 상품의 수량을 변경하는 기능처럼 사용자의 액션에 대한 즉각적인 피드백을 제공할 필요가 있을 때 유용합니다.
낙관적 업데이트의 핵심 아이디어는 다음과 같습니다.
- 사용자 액션(ex 좋아요 버튼 클릭)
- 사용자의 화면을 기대하는 결과로 즉시 업데이트한다.
- 화면이 먼저 업데이트되고, 서버에 네트워크 요청을 보낸다.
- 사용자는 변경된 UI를 보기 때문에, 뒤에서 실행되는 네트워크 요청에 대해서 인지하지 못한다.
- 요청이 완료되면 서버의 응답으로 화면을 업데이트한다.
- 요청이 실패했을 경우 이전 상태로 복원하고, 사용자에게 요청이 실패했다는 피드백을 제공한다.
(1) useState로 낙관적 업데이트를 구현하는 방법
먼저 useState를 이용해서 낙관적 업데이트를 구현해 봤습니다.
현재 좋아요 상태와 개수를 보여주고, 버튼을 클릭하면 좋아요 추가/제거 api를 요청하는 간단한 컴포넌트입니다.
import { startTransition } from 'react'
import { Heart } from "lucide-react"
import { addLike, removeLike } from "@/app/services"

interface State {
  isLike: boolean
  count: number
}

function LikeButton() {
  const [state, setState] = useState<State>({
    isLike: false,
    count: 0
  })

  const handleClick = async () => {
    const currentState = state
    const nextState = {
      isLike: !currentState.isLike,
      count: currentState.isLike ? currentState.count - 1 : currentState.count + 1
    }

    // 낙관적 업데이트
    setState(nextState)

    try {
      const response = nextState.isLike ? await addLike() : await removeLike()
      // 서버 응답 결과로 UI를 업데이트
      setState(response)
      setError('')
    } catch (error) {
      if (error instanceof Error) {
        // 요청에 실패했을 경우 이전 상태로 복원
        setState(currentState)
        setError(error.message)
      }
    }
  }

  return (
    <button onClick={handleClick}>
      {
        state.isLike ?
        <Heart color="#d04e4e" fill="#d04e4e" size={80} /> :
        <Heart color="#d04e4e" size={80} />
      }
      <span>{state.count}</span>
    </button>
  )
}import { startTransition } from 'react'
import { Heart } from "lucide-react"
import { addLike, removeLike } from "@/app/services"
interface State {
isLike: boolean
count: number
}
function LikeButton() {
const [state, setState] = useState<State>({
isLike: false,
count: 0
})
const handleClick = async () => {
const currentState = state
const nextState = {
isLike: !currentState.isLike,
count: currentState.isLike ? currentState.count - 1 : currentState.count + 1
}
// 낙관적 업데이트
setState(nextState)
try {
const response = nextState.isLike ? await addLike() : await removeLike()
// 서버 응답 결과로 UI를 업데이트
setState(response)
setError('')
} catch (error) {
if (error instanceof Error) {
// 요청에 실패했을 경우 이전 상태로 복원
setState(currentState)
setError(error.message)
}
}
}
return (
<button onClick={handleClick}>
{
state.isLike ?
<Heart color="#d04e4e" fill="#d04e4e" size={80} /> :
<Heart color="#d04e4e" size={80} />
}
<span>{state.count}</span>
</button>
)
}- api 요청을 보내기 전에 현재 상태를 저장하기 위해
currentState변수를 선언합니다.currentState는 요청이 실패했을 때 다시 현재 상태로 되돌아가는 데 사용됩니다. - 현재 상태를 기준으로 낙관적 상태(
nextState)를 계산합니다.isLike를 반대 값으로 변환- 변환된
isLike값에 따라count에 +1 또는 -1을 적용
nextState로setState를 호출해서 요청을 보내기 전에 먼저 컴포넌트를 렌더링합니다.- 요청 성공 -> 서버의 응답(
response)으로 컴포넌트를 다시 렌더링합니다. - 요청 실패 ->
currentState를 이용해서 다시 이전 UI로 렌더링합니다.
(2) useOptimistic 훅으로 낙관적 업데이트를 구현하는 방법
먼저 useOptimistic의 구조와 동작 방식에 대해서 알아보겠습니다.
const state: State = { isLike: false, count: 0 }
const [optimisticState, toggleOptimisticIsLike] = useOptimistic<State, State['isLike']>(
  // 훅의 초기 상태
  state,
  // updateFn
  (currentState: State, optimisticValue: State['isLike']): State => {
  return {
    isLike: optimisticValue,
    count: optimisticValue ? currentState.count + 1 : currentState.count - 1
  }
})
const state: State = { isLike: false, count: 0 }
const [optimisticState, toggleOptimisticIsLike] = useOptimistic<State, State['isLike']>(
// 훅의 초기 상태
state,
// updateFn
(currentState: State, optimisticValue: State['isLike']): State => {
return {
isLike: optimisticValue,
count: optimisticValue ? currentState.count + 1 : currentState.count - 1
}
})useOptimistic 훅의 매개변수
- state
- 훅의 초기 상태를 지정합니다.
- updateFn
optimisticState(낙관적인 상태)를 계산하는 reducer 역할을 하는 함수입니다.- 실행될 때 첫 번째 매개변수로 현재
optimisticState의 값, 두 번째 매개변수로toggleOptimisticIsLike함수의 인자를 전달받습니다.
useOptimistic 훅의 리턴 값
- optimisticState
useOptimistic훅의 현재 상태입니다.- 액션이 pending 상태 경우
updateFn함수가 반환한 값과 동일한 값을 가집니다. - 액션이 pending 상태가 아닐 경우 초기
state와 동일한 값(state가 객체일 경우 동일한 참조)을 가집니다.
- toggleOptimisticIsLike
optimisticState를 변경하기 위해 호출하는 함수입니다.toggleOptimisticIsLike함수를 호출하면updateFn이 호출되어optimisticState가 업데이트됩니다.- 호출 시 전달 받은 인자가
updateFn의 두 번째 인자로 전달됩니다.
처음 공식 문서에서 훅의 매개변수와 리턴 값에 대한 설명을 읽었을 때 잘 이해가 되지 않았습니다.
optimisticState에 대한 설명에서 액션, pending 상태란 말이 나오는데 무슨 뜻일까요?
const handleClick = () => {
  startTransition(async () => {
    const nextIsLike = !optimisticState.isLike

    // 낙관적 업데이트
    toggleOptimisticIsLike(nextIsLike)

    // 아주 오래 걸리는 작업
    await new Promise<void>((resolve) => {
			setTimeout(resolve, 10000)
		})
  })
}
const handleClick = () => {
startTransition(async () => {
const nextIsLike = !optimisticState.isLike
// 낙관적 업데이트
toggleOptimisticIsLike(nextIsLike)
// 아주 오래 걸리는 작업
await new Promise<void>((resolve) => {
setTimeout(resolve, 10000)
})
})
}위 코드에서 startTransition의 인자로 전달되는 콜백 함수를 "액션"이라고 부릅니다.
startTransition은 UI 렌더링을 백그라운드에서 처리하기 위해 사용하는 api입니다.
액션 내부에서 toggleOptimisticIsLike 함수가 호출되면, updateFn이 실행되고 updateFn이 반환한 값으로 optimisticState가 변경됩니다.
optimisticState은 10초 뒤 promise가 resolve되어 액션 함수의 실행이 종료될 때 까지 유지됩니다.
액션 함수의 실행이 종료되면, useOptimistic 훅은 optimisticState의 값을 다시 초기 값으로 변경합니다.
정리하면, 액션이 실행 중인 상태를 pending 상태라고 부르고, 낙관적인 상태(optimisticState)는 액션이 pending 상태인 동안 유지됩니다.
액션의 실행이 종료되면 초기 상태로 돌아가는 useOptimistic 훅의 동작 방식 때문에 요청이 실패했을 때 초기 상태로 쉽게 되돌리는 로직을 쉽게 구현할 수 있습니다.
=> 여기서 주의할 점이 있습니다.
액션 내부에서 호출한 api 요청이 성공하더라도 useOptimistic 훅의 초기 상태를 변경하지 않으면 optimisticState는 항상 초기 상태로 되돌아갑니다.
따라서, api 요청 후 낙관적인 상태를 유지하기 위해 api의 응답을 useOptimistic 훅의 초기 상태와 동기화하는 로직이 필요합니다.
1️⃣ useState를 사용하여 동기화하는 방법
useState가 반환한 state를useOptimistic훅의 초기 상태로 전달합니다.setState가 호출되어 컴포넌트가 리렌더링될 때마다useOptimistic이 새로운 초기 상태와 함께 호출됩니다.- api 요청에 성공할 경우
- 서버의 응답으로 setState를 호출하고, 컴포넌트가 리렌더링 됩니다.
useOptimistic이 새로운 초기 상태(state)와 함께 호출되어 낙관적인 상태로 업데이트된 화면이 유지됩니다.
- api 요청에 실패할 경우
setError가 호출되어 컴포넌트가 리렌더링됩니다.useOptimistic의 초기 상태가 변경되지 않았기 때문에optimisticState가 다시 초기 상태로 되돌아가고, 사용자 액션 이전 화면으로 돌아갑니다.
import { startTransition } from 'react'
import { Heart } from "lucide-react"
import { addLike, removeLike } from "@/app/services"

interface State {
  isLike: boolean
  count: number
}

type Value = State['isLike']

function LikeButton() {
  const [state, setState] = useState<State>({
    isLike: false,
    count: 0
  })

  const [optimisticState, toggleOptimisticIsLike] = useOptimistic<State, Value>(
  state,
  (currentState: State, optimisticValue: Value): State => {
    return {
      isLike: optimisticValue,
      count: optimisticValue ? currentState.count + 1 : currentState.count - 1
    }
  })

  const handleClick = () => {
    startTransition(async () => {
      const nextIsLike = !optimisticState.isLike

      // 낙관적 업데이트
      toggleOptimisticIsLike(nextIsLike)

      try {
        const response = nextIsLike ? await addLike() : await removeLike()

        // 서버 응답 결과로 UI를 업데이트
        setState(response)
        setError('')
      } catch (error) {
        if (error instanceof Error) {
          setError(error.message)
        }
      }
    })
  }

  return (
    <button onClick={handleClick}>
      {
        optimisticState.isLike ?
        <Heart color="#d04e4e" fill="#d04e4e" size={80} /> :
        <Heart color="#d04e4e" size={80} />
      }
      <span>{optimisticState.count}</span>
    </button>
  )
}import { startTransition } from 'react'
import { Heart } from "lucide-react"
import { addLike, removeLike } from "@/app/services"
interface State {
isLike: boolean
count: number
}
type Value = State['isLike']
function LikeButton() {
const [state, setState] = useState<State>({
isLike: false,
count: 0
})
const [optimisticState, toggleOptimisticIsLike] = useOptimistic<State, Value>(
state,
(currentState: State, optimisticValue: Value): State => {
return {
isLike: optimisticValue,
count: optimisticValue ? currentState.count + 1 : currentState.count - 1
}
})
const handleClick = () => {
startTransition(async () => {
const nextIsLike = !optimisticState.isLike
// 낙관적 업데이트
toggleOptimisticIsLike(nextIsLike)
try {
const response = nextIsLike ? await addLike() : await removeLike()
// 서버 응답 결과로 UI를 업데이트
setState(response)
setError('')
} catch (error) {
if (error instanceof Error) {
setError(error.message)
}
}
})
}
return (
<button onClick={handleClick}>
{
optimisticState.isLike ?
<Heart color="#d04e4e" fill="#d04e4e" size={80} /> :
<Heart color="#d04e4e" size={80} />
}
<span>{optimisticState.count}</span>
</button>
)
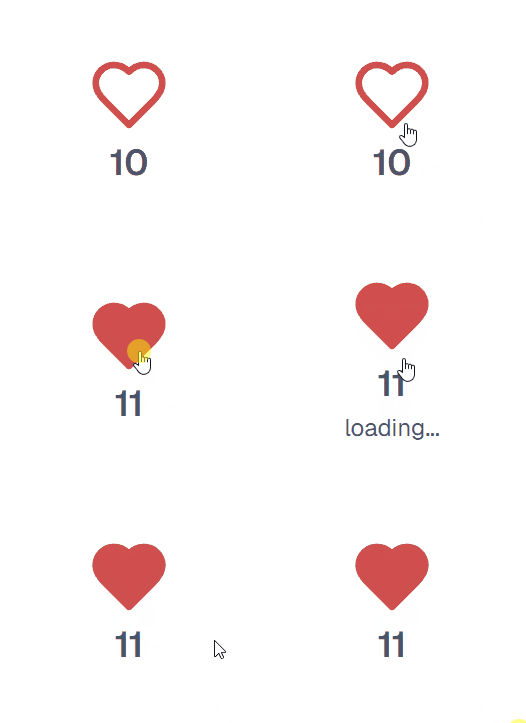
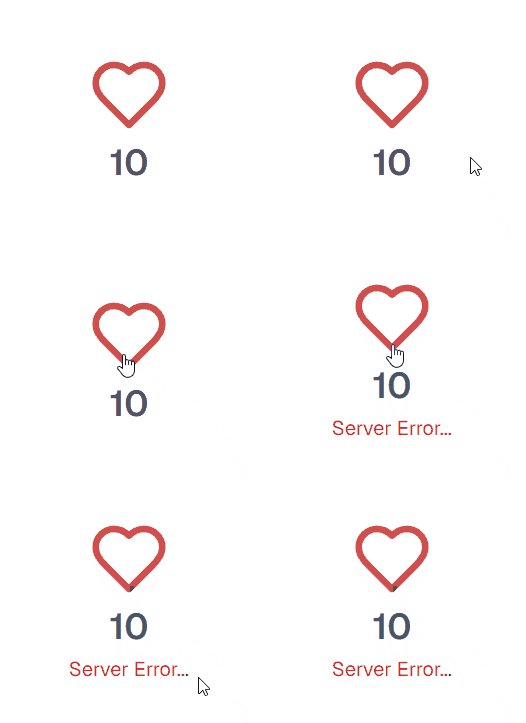
}=> 사용자의 화면에는 api 요청 결과에 따라 이렇게 보여집니다 👍
 API 요청에 성공했을 경우
 API 요청에 실패했을 경우
2️⃣ props를 사용하여 동기화하는 방법
- 부모 컴포넌트로부터 전달받은
props를useOptimistic의 초기 값으로 전달합니다. - 부모 컴포넌트의 state가 변경되면,
LikeButton컴포넌트가 다시 리렌더링되고,useOptimistic훅이 새로운 초기 상태와 함께 호출됩니다.
// page.tsx
import { useEffect, useState } from "react"
import LikeButton from "@/app/LikeButton"
import { getLike, addLike, removeLike } from "@/app/services"

interface State {
  isLike: boolean
  count: number
}

export default function Home() {
  const [state, setState] = useState<State>({
    isLike: false,
    count: 0
  })

  const [error, setError] = useState('')

  useEffect(() => {
    const fetchData = async () => {
      const response = await getLike()
      setState(response)
    }

    fetchData();
  }, [])

  const toggleAction = async (isLike: boolean) => {
    try {
      const response = isLike ? await addLike() : await removeLike()
      setState(response)
      setError('')
    } catch (error) {
      if (error instanceof Error) {
        setError(error.message)
      }
    }
  }

  return (
    <div>
      <LikeButton
        count={state.count}
        isLike={state.isLike}
        error={error}
        toggleAction={toggleAction}
      />
    </div>
  );
}
// page.tsx
import { useEffect, useState } from "react"
import LikeButton from "@/app/LikeButton"
import { getLike, addLike, removeLike } from "@/app/services"
interface State {
isLike: boolean
count: number
}
export default function Home() {
const [state, setState] = useState<State>({
isLike: false,
count: 0
})
const [error, setError] = useState('')
useEffect(() => {
const fetchData = async () => {
const response = await getLike()
setState(response)
}
fetchData();
}, [])
const toggleAction = async (isLike: boolean) => {
try {
const response = isLike ? await addLike() : await removeLike()
setState(response)
setError('')
} catch (error) {
if (error instanceof Error) {
setError(error.message)
}
}
}
return (
<div>
<LikeButton
count={state.count}
isLike={state.isLike}
error={error}
toggleAction={toggleAction}
/>
</div>
);
}interface Props {
isLike: boolean
count: number
error: string
toggleAction: (isLike: boolean) => Promise<void>
}
export default function LikeButton({ count, isLike, error, toggleAction }: Props) {
// props를 초기 상태로 사용
const [optimisticState, toggleOptimisticIsLike] = useOptimistic<State, State['isLike']>({
count,
isLike
}, (currentState, optimisticValue) => {
return {
isLike: optimisticValue,
count: optimisticValue ? currentState.count + 1 : currentState.count - 1
}
})
const [isPending, startTransition] = useTransition()
const handleClick = () => {
startTransition(async () => {
const nextIsLike = !optimisticState.isLike
// 낙관적 업데이트
toggleOptimisticIsLike(nextIsLike)
await toggleAction(nextIsLike)
})
}
return (
<button onClick={handleClick}>
{
optimisticState.isLike ?
<Heart color="#d04e4e" fill="#d04e4e" size={80} /> :
<Heart color="#d04e4e" size={80} />
}
<span>{optimisticState.count}</span>
</button>
)
}요약
- 낙관적 업데이트란 서버에 요청을 보내기 전에 UI를 먼저 업데이트하여 사용자에게 빠르게 피드백을 제공하는 기법입니다.
- React 19에 낙관적 업데이트를 구현하기 위한
useOptimistic훅이 새롭게 추가되었습니다.
useOptimistic 훅의 장점
- React에 내장된 훅이므로 별도의 라이브러리 설치 없이 가볍게 사용할 수 있습니다.
- 초기 상태를 내부적으로 관리하여, api 요청이 실패했을 때 쉽게 초기 상태로 롤백할 수 있습니다.
useOptimistic 훅의 단점
- 서버 상태와
useOptimistic훅의 초기 상태를 동기화하는 추가적인 로직이 필요합니다. toggleOptimisticIsLike함수는 반드시 React Form Action과 startTransition 함수 내부에서 호출해야 합니다. 그렇지 않을 경우 아래 에러 메시지가 콘솔에 출력됩니다.
"An optimistic state update occurred outside a transition or action. To fix, move the update to an action, or wrap with startTransition."
전체 코드는 저장소에서 확인할 수 있습니다.
잘못된 내용이 있을 수 있습니다. 피드백은 언제나 환영입니다! 🙂